|
 1/
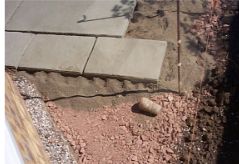
Dig down about 6 inches below patio level.
Here a trenching spade is being used on particularly difficult
soil. Check the level of this using a spirit level and wooden
pegs. It is not important that it is completely flat, but a
bump of soil will mean less hardcore and a less stable foundation. 1/
Dig down about 6 inches below patio level.
Here a trenching spade is being used on particularly difficult
soil. Check the level of this using a spirit level and wooden
pegs. It is not important that it is completely flat, but a
bump of soil will mean less hardcore and a less stable foundation.
Soil that is removed will have
to be disposed of. Sometimes it is possible to do this in the
same garden, filling a low area, building up beds, going towards
a rockery or raised bed etc. More often it will need to removed
in a skip.
|
|
 2/
Hardcore is then laid and leveled before being compacted with
a wacca plate. 2/
Hardcore is then laid and leveled before being compacted with
a wacca plate.
Unless you are laying the patio
over a short time period (and remember it takes the professionals
a few days from start to finish) it might be a good idea to
order heavy materials as and when they are needed. Hardcore
first, then sand and cement and slabs later.
The alternative is that you may
not be able to use your garage for a while as there's a few
tons of building materials on the driveway- or half your front
lawn gets killed while the materials sit there for an extended
period.
|
|
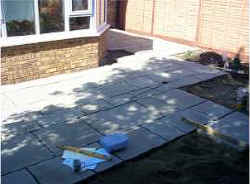
 3/
Lay slabs on a dry mortar mixture (1 part cement to 5 parts
sand) using builders lines for reference at the edge of the
patio. 3/
Lay slabs on a dry mortar mixture (1 part cement to 5 parts
sand) using builders lines for reference at the edge of the
patio.
The first slab down is the most
important as the others are all referenced from this. Make sure
it is the right height and at the top of the 1" in 6ft slope.
If the patio is adjoining the house, this is where you should
begin.
Make sure the slabs are
below the level of the damp proof course
|
 4/
A rubber hammer is used to bed the slabs down and get them level.
Fine adjustments can be made thanks to the mortar layer. 4/
A rubber hammer is used to bed the slabs down and get them level.
Fine adjustments can be made thanks to the mortar layer.
When placing slabs, take care not to stand
them on edge and then lay them down, this will disturb the mortar
layer unduly.
Always work from the mortar / hardcore side
of the work, don't tread on slabs that you have already laid.
|
 5/
Use a spirit level with each slab, and double check! Mistakes
are not easy to rectify. 5/
Use a spirit level with each slab, and double check! Mistakes
are not easy to rectify.
Remember the slope 1" in 6ft - away from the
house.
When all slabs have been laid, brush a dry
mix of mortar into the joints between them.
|
|
 6/
Slabs are big heavy things! 6/
Slabs are big heavy things!
Take care in lifting and carrying
them
Use a wheelbarrow wherever possible
Wear gloves when handling slabs
(not like Sid here!)
Stack them on end leaning against
each other
|
 7/
Accurate measurement and laying out of guide
lines is vital as a small error is soon magnified when the patio
is several metres across. Don't walk on the patio for a few
days until the mortar mix has hardened. 7/
Accurate measurement and laying out of guide
lines is vital as a small error is soon magnified when the patio
is several metres across. Don't walk on the patio for a few
days until the mortar mix has hardened.
When all slabs are laid brush a dry mortar
mix between the gaps
If laid properly, you won't get any growth
between the slabs and you will have extended your effective
living area quite considerably.
|


